What is ComfyUI
ComfyUI stands as an advanced, modular GUI engineered for stable diffusion, characterized by its intuitive graph/nodes interface. By facilitating the design and execution of sophisticated stable diffusion pipelines, it presents users with a flowchart-centric approach. Seamlessly compatible with both SD1.x and SD2.x, ComfyUI introduces a plethora of optimizations. Noteworthy among these is its capability to selectively re-execute only segments of the workflow that undergo changes between runs. Additional features include the capacity to load checkpoints, integrate safetensors models, and support a diverse range of upscaling models, such as ESRGAN and its variants, SwinIR, Swin2SR, and more. Moreover, users can conveniently save and retrieve their workflows using JSON files or even harness the power of PNG files to generate and initiate comprehensive workflows.
Advantages of ComfyUI: ComfyUI VS AUTOMATIC1111
AUTOMATIC1111 has long been regarded as the default choice for Stable Diffusion GUI. Yet, with the emergence of ComfyUI, users find themselves at a crossroad, questioning the better choice. Here’s a thorough comparison to aid in your decision-making.
Pros of Using ComfyUI:
- Lightweight: Ensures speedy performance.
- Flexible: Offers a high degree of configurability.
- Transparent: Users have a clear view of the data flow.
- Shareability: Each file represents a reproducible workflow, making sharing a breeze.
- Prototyping: It emphasizes a visual approach to prototyping, eliminating the need for coding.
Cons of Using ComfyUI:
- Inconsistent Interface: Node placement varies with each workflow, necessitating users to determine modifications.
- Over-Detailed: While detail can be beneficial, the average user might find the intricate wiring overwhelming. After all, isn’t simplicity the essence of a GUI?
- Missing Inpainting Tool: Users must resort to an external application for inpainting tasks.

Installing ComfyUI: A Comprehensive Guide
Whether you’re operating on Windows, Linux, or Mac, we have you covered. Here’s how you can swiftly get ComfyUI up and running on your system.
Quick-Install (Windows, NVIDIA)
ComfyUI offers a portable standalone version, optimized for NVIDIA GPU or CPU. Note: Using a CPU is considerably slower, making this installation almost exclusive for NVIDIA users.
- Click on the provided Download Link to initiate the download.
- Utilize 7-Zip to extract the .zip file.
- Access the extracted
ComfyUI_windows_portablefolder to reveal the ComfyUI directory. - To start ComfyUI, double-click
run_nvidia_gpu.batfor NVIDIA GPU usage orrun_cpu.batfor CPU.
Clone from Github (Windows, Linux)
For NVIDIA GPU:
- On Windows, open Command Prompt (Search “cmd”). For Linux, launch the Terminal using
Ctrl+Alt+T. - Sequentially execute the following commands:
git clone https://github.com/comfyanonymous/ComfyUI
cd ComfyUI
pip install torch torchvision torchaudio --extra-index-url https://download.pytorch.org/whl/cu118 xformers -r requirements.txt- Kickstart ComfyUI with the command:
python main.pyTroubleshooting NVIDIA GPU: If encountering the “Torch not compiled with CUDA enabled” error, follow the given uninstallation and reinstallation steps.
For AMD GPU:
- Similar to NVIDIA, open your Command Prompt or Terminal.
- Execute the listed commands one after the other. If you face issues due to an unsupported GPU, utilize the provided override command.
Clone from Github (Mac)
ComfyUI is compatible with Apple Mac silicon (M1 or M2) on modern macOS versions.
- Install pytorch as directed in the Accelerated PyTorch training on Mac guide.
- Clone the ComfyUI repository and install its dependencies. If you possess another Stable Diffusion UI, there’s potential for dependency reuse.
- Activate ComfyUI using the designated command, ensuring you’ve installed the latest pytorch nightly for the
--force-fp16functionality.
ComfyUI provides a seamless experience for Stable Diffusion, and these steps ensure you’re well on your way to utilizing its robust features.
Navigating the ComfyUI User Interface
ComfyUI’s graph-based design is hinged on nodes, making them an integral aspect of its interface. Here’s a concise guide on how to interact with and manage nodes for an optimized user experience.
A Deep Dive into ComfyUI Nodes
Adding a Node:
- Simply right-click on any vacant space.
- Choose Add Node from the dropdown menu.

Accessing Node List & Search:
- Double-click on any blank area.
- This action unfurls a comprehensive list of all nodes, accompanied by a search bar, enabling you to swiftly locate specific nodes.

Selecting Multiple Nodes:
- Hold down the CTRL key and drag your cursor.
- This lets you highlight multiple nodes simultaneously.
- To move the selected nodes collectively, hold SHIFT and drag them to your desired position.

Customizing Node Color:
- Personalize your workspace by changing node colors.
- Right-click on the desired node.
- Hover over Color in the dropdown.
- From the emerging color palette, select your preferred shade.

Mastering Node Connections in ComfyUI
In ComfyUI, connecting nodes is more than just a drag-and-drop affair. It’s a color-coordinated system that’s intuitive and ensures that you’re connecting compatible nodes for optimal results.
Initiating Compatible Node Connections:
- Begin by dragging an input.
- Releasing it in blank space unfurls a list showcasing all compatible nodes.
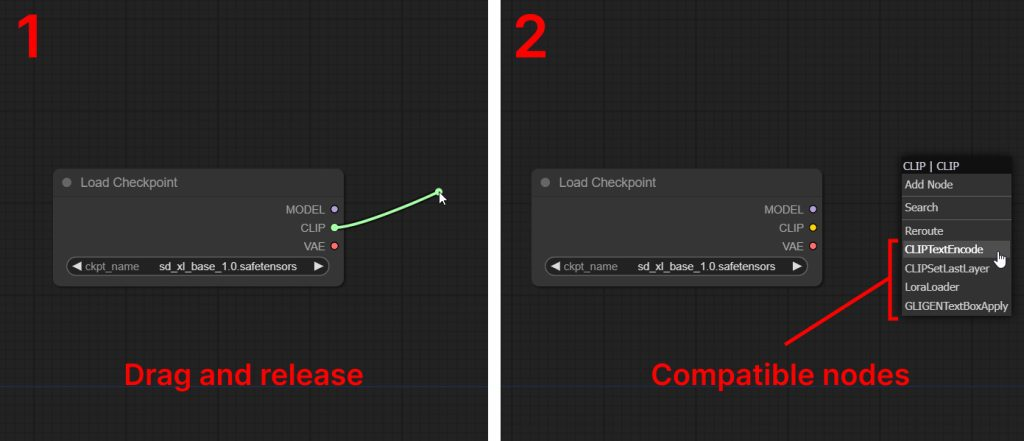
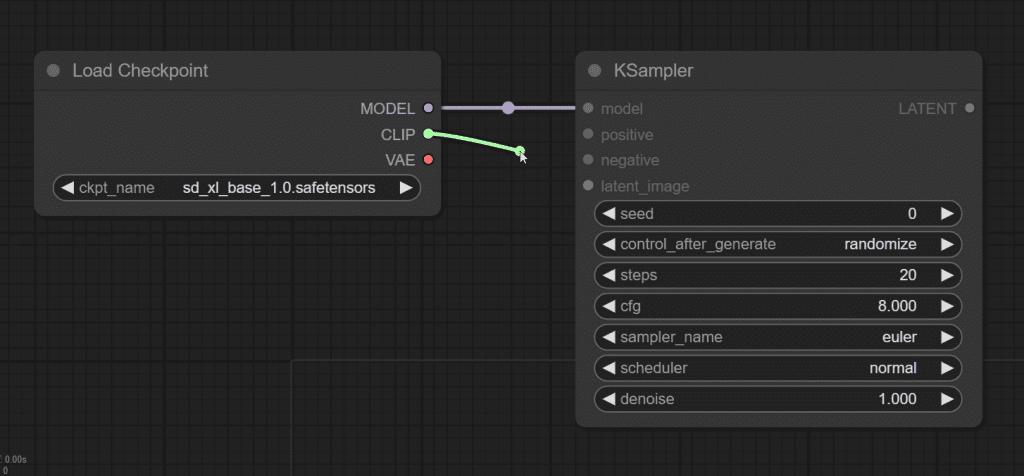
Determining Compatibility via Color-Coding:
- Each input and output has a distinct color.
- Compatibility is governed by this color-coding system. For instance, a purple input will seamlessly connect to a purple output.
- In contrast, nodes with mismatched colors won’t establish a connection, preventing errors and ensuring smooth operation.
Understanding and using this color-coordinated compatibility feature can greatly enhance your efficiency and accuracy when working with nodes in ComfyUI.
Executing Workflows in ComfyUI: A Step-by-Step Guide
Executing workflows in ComfyUI follows a systematic approach that takes into account the order of connected nodes and ensures that every node has its required inputs.
Starting the Execution:
- Initiate the process by clicking on Queue Prompt.
- The system then sifts through the workflow, following the nodes in the sequence they’re interconnected.
- The starting point is typically the Loaders. These nodes stand out as they solely possess outputs and are devoid of any inputs.

Preventing Execution Hiccups:
- If any nodes lack their necessary inputs, the system blocks the prompt execution.
- Ensure all nodes are sufficiently connected and equipped with the right inputs to avoid disruptions and achieve smooth workflow operations.

A Comprehensive Guide to ComfyUI Nodes
Navigating through ComfyUI involves understanding the interplay of its various nodes, which are central to the Stable Diffusion process. Here’s a deep dive into these nodes and how they contribute to image generation.
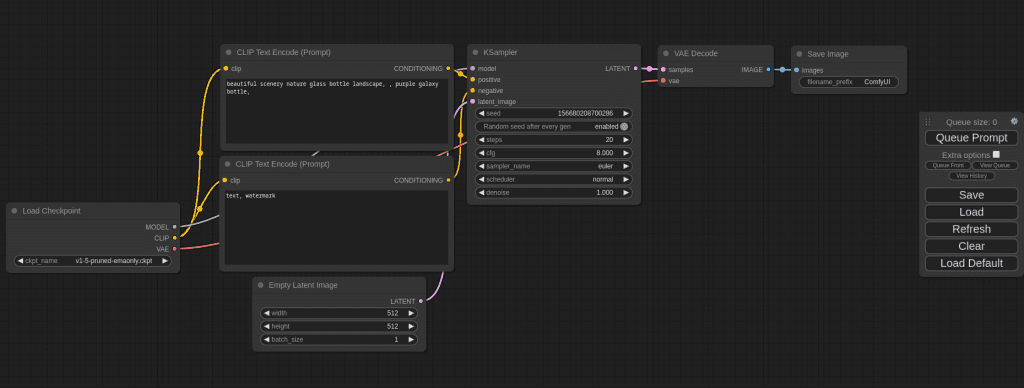
Starting Point: The Default Workflow
If you’ve altered the workflow or need a refresher, hit Load Default located on the right sidebar.
1. Load Checkpoint Node:
- The .safetensors or .ckpt checkpoint models play a pivotal role in image generation, composed of:
- CLIP model: Converts text into a digestible format for Unet.
- Unet: Orchestrates the diffusion process, leading to image generation.
- VAE: Translates images between latent space and pixel space.
- In ComfyUI, this node is delineated by the Load Checkpoint node and its three outputs.

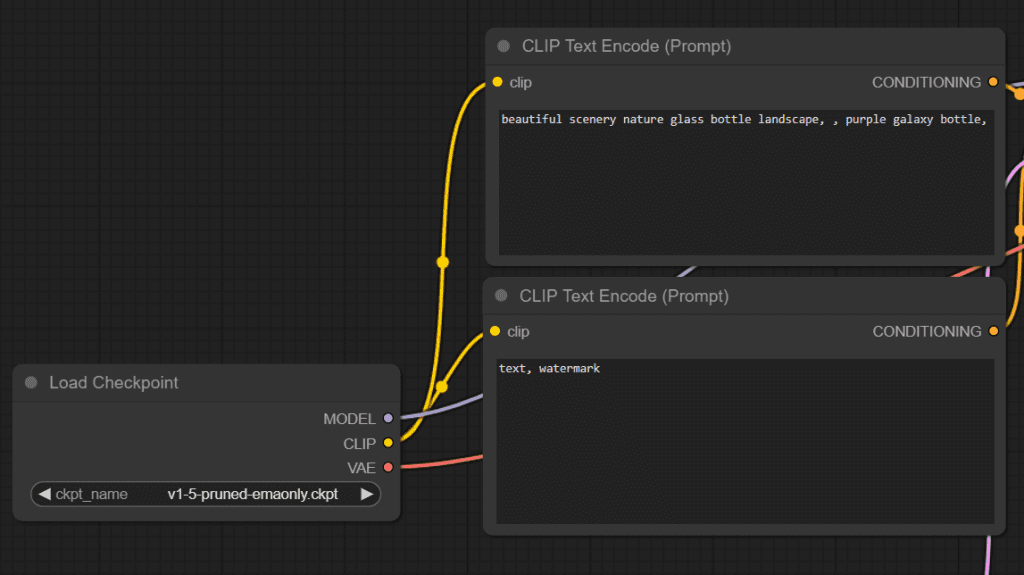
2. CLIP Text Encode Node:
- The CLIP output from the Load Checkpoint node funnels into the CLIP Text Encode nodes.
- Its mission is straightforward: Turn textual input into embeddings the Unet recognizes.
3. KSampler:
- Dubbed as the heart of the image generation process in ComfyUI, the KSampler node consumes the most execution time.
- It amalgamates various inputs like the model, positive and negative prompts, and latent_image to spearhead image generation.
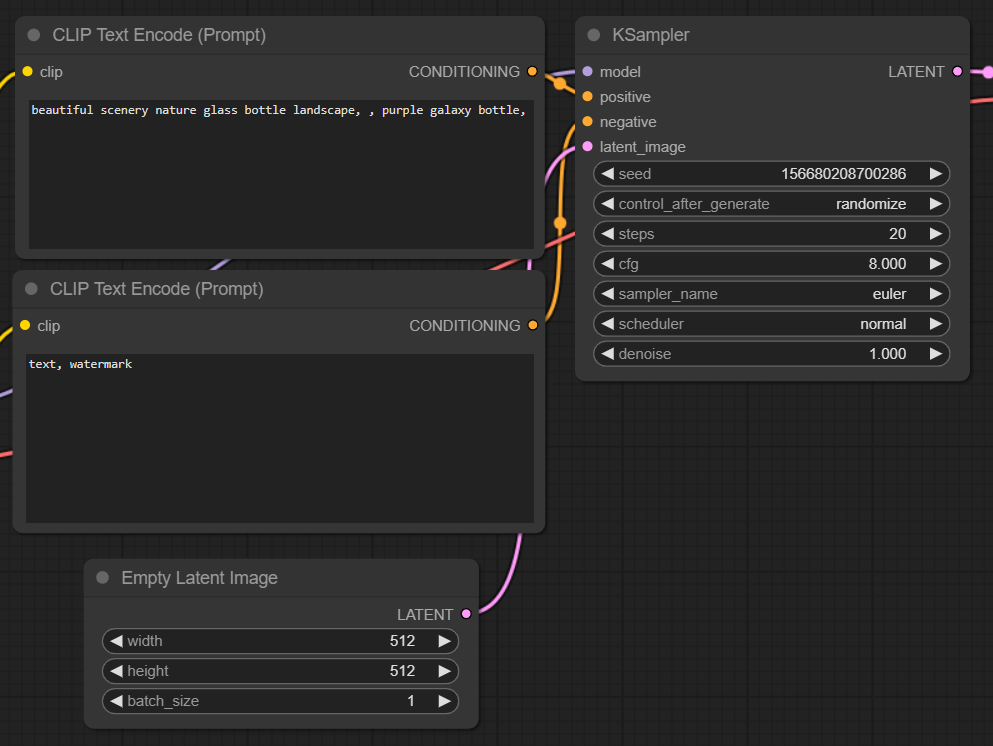
The Magic of KSampler:
- At its core, Diffusion transforms a random data array into an image reflective of the prompt text.
- KSampler is responsible for this transformative journey, presenting the image in a latent representation.
4. VAE:
- The VAEDecode node is the final piece of this puzzle, taking in the VAE and the latent space image.
- Its role is vital: translating the latent image into a visible pixel format, which then funnels into the Save Image node for display and download.

ComfyUI Models: A Comprehensive Guide to Downloads & Management
1. Why Download Multiple Models?
- If you’re embarking on the journey with SDXL, it’s wise to have a range of models at your disposal.
- Starting with the checkpoints is recommended. As you dive deeper, you can expand your model library.
2. Checkpoints – The Heart of ComfyUI
- Location: Store in
ComfyUI/models/checkpoints. - Key Models to Consider:
3. VAE (Variational AutoEncoder)
- Location: Tuck them in
ComfyUI/models/vae. - Noteworthy Model:
4. LoRAs (Local Refinement Architectures)
- Location: They feel right at home in
ComfyUI/models/loras. - Model Highlight:
5. Upscalers – Enhancing Image Quality
- Certain workflows bypass them, while others deem them essential.
- Location: House them in
ComfyUI/models/upscaler. - Models to Look Out For:
6. Optimizing Storage: Sharing Models between Different UIs
- If you’re using multiple UIs like AUTOMATIC1111 alongside ComfyUI, avoid redundancy by sharing model paths.
- Tip: Navigate to the Config file within ComfyUI to specify model search paths.
- For Standalone Windows Build: Look for the configuration file in the ComfyUI directory. To activate, rename it to
extra_model_paths.yamland tweak as needed using a text editor of your choice.
ComfyUI Workflows: Your Ultimate Guide to Fluid Image Generation
1. What Makes ComfyUI Workflows Stand Out?
- Flexibility: With ComfyUI, swapping between workflows is a breeze.
- Diverse Options: A myriad of workflows from the ComfyUI official repository are at your fingertips.
2. How to Load a New Workflow?
- Simple Steps:
- Hit the Load button on the right sidebar.
- Choose the desired
.jsonworkflow file.
- Note: Certain workflows necessitate cloning the repository to
ComfyUI/custom_nodes. Once done, remember to restart ComfyUI.

3. Top Workflows from the Stable Diffusion Community:
- Sytan’s SDXL Workflow
- Highlights: A crowd favorite for SDXL. Notably, it boasts upscaling features.
- Dive Deeper: Documentation

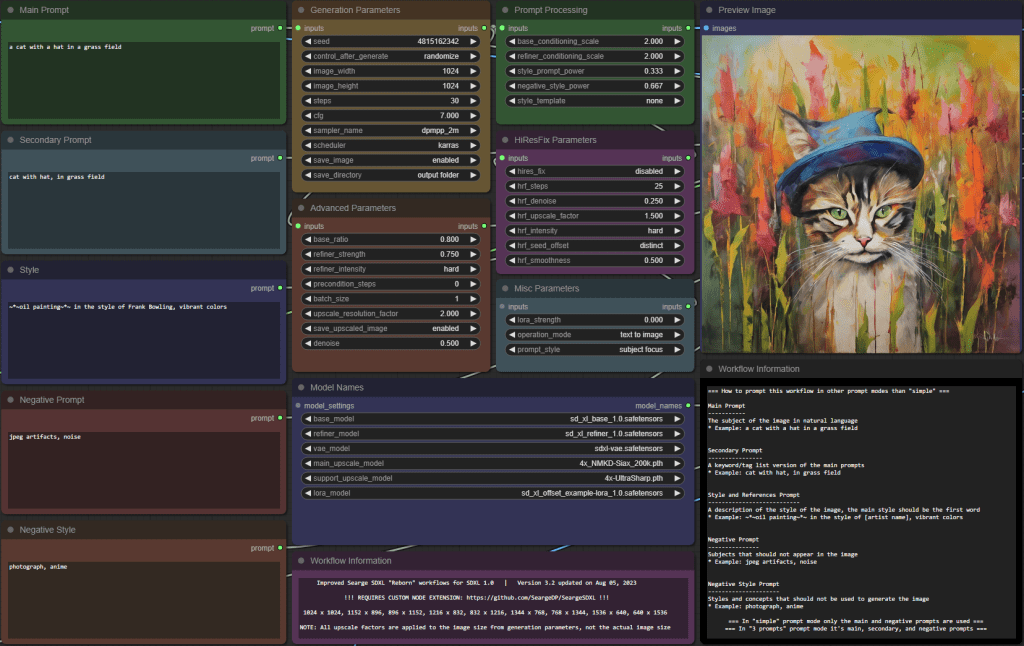
- Searge SDXL Workflow
- Features: A versatile workflow offering 3 modes – text-to-image, image-to-image, and inpainting. Seamlessly toggle between modes using a single option.
- More Details: Documentation
- Installation Guide:
- Make your way to
ComfyUI/custom_nodes/. - Launch a command line window within the
custom_nodesdirectory. - Execute:
git clone https://github.com/SeargeDP/SeargeSDXL.git - Reboot ComfyUI.
- Make your way to
ComfyUI Manager: Managing Custom Nodes
ComfyUI Manager simplifies the process of managing custom nodes directly through the ComfyUI interface. This tool is pivotal for those looking to expand the functionalities of ComfyUI, keep nodes updated, and ensure smooth operation.
1. Installation Process:
Step-by-step Guide:
- Navigate to Custom Nodes Folder: Open PowerShell (for Windows users) or Terminal (for Mac users) and change your directory:
cd ComfyUI/custom_nodes - Clone ComfyUI Manager: Enter the following command to clone the ComfyUI Manager node:
git clone https://github.com/ltdrdata/ComfyUI-Manager - Restart: It’s essential to restart ComfyUI to apply the changes.
2. How to Use ComfyUI Manager?
Upon successful installation, here’s how you can make the most of it:
- Accessing Manager: Locate the “Manager” button added to the “Queue Prompt” menu.

- GUI Interface: On clicking the “Manager” button, a graphical interface will present options to:
- Install/Uninstall Custom Nodes: Easily add new functionalities or remove redundant nodes.
- Address Missing Nodes: If the current workflow demands specific nodes you don’t have, this function will pinpoint them, making it easy to add them.
- Handle Models: Seamlessly install various models, from checkpoint models to AI upscalers, VAEs, LoRA, and ControlNet models.
- Update UI: Keep your ComfyUI interface updated for optimal experience.
- Community Manual: Access the manual to understand the finer details of the nodes and workflows.

- Custom Node Management: Navigate to the ‘Install Custom Nodes’ menu. This provides an avenue to manage your custom nodes effectively – whether you want to disable, uninstall, or even incorporate a fresh node.
ComfyUI Shortcuts
| Keybind | Explanation |
|---|---|
| Ctrl + Enter | Queue up current graph for generation |
| Ctrl + Shift + Enter | Queue up current graph as first for generation |
| Ctrl + S | Save workflow |
| Ctrl + O | Load workflow |
| Ctrl + A | Select all nodes |
| Alt + C | Collapse/uncollapse selected nodes |
| Ctrl + M | Mute/unmute selected nodes |
| Ctrl + B | Bypass selected nodes (acts like the node was removed from the graph and the wires reconnected through) |
| Delete/Backspace | Delete selected nodes |
| Ctrl + Delete/Backspace | Delete the current graph |
| Space | Move the canvas around when held and moving the cursor |
| Ctrl/Shift + Click | Add clicked node to selection |
| Ctrl + C/Ctrl + V | Copy and paste selected nodes (without maintaining connections to outputs of unselected nodes) |
| Ctrl + C/Ctrl + Shift + V | Copy and paste selected nodes (maintaining connections from outputs of unselected nodes to inputs of pasted nodes) |
| Shift + Drag | Move multiple selected nodes at the same time |
| Ctrl + D | Load default graph |
| Q | Toggle visibility of the queue |
| H | Toggle visibility of history |
| R | Refresh graph |
| Double-Click LMB | Open node quick search palette |
Ctrl can also be replaced with Cmd instead for macOS users